

How to Design Custom Teacher Hoodies With School Logos
Table of Contents
- Start With the Right Hoodie Blank
- School Logo Design Best Practices for Apparel
- Step 1: Prepare Your Logo Files for Printing
- Step 2: Pick Your Print Method: Screen Printing vs. Embroidery
- Step 3: Choose Colors That Match Your School
- Custom Teacher Apparel Ideas That Get Worn
- How to Manage Bulk Ordering Custom School Hoodies
- Make Your Custom Teacher Hoodies Last
- Frequently Asked Questions
Last Updated: September 8, 2026
Designing custom teacher hoodies with school logos balances school pride with apparel faculty actually want to wear. The best results come from choosing a quality garment, preparing artwork correctly, and matching the decoration method to your design.
Start With the Right Hoodie Blank
The garment matters as much as the design. A heavy, comfortable hoodie gets worn weekly; a thin, scratchy one gets donated. Look for a cotton-polyester blend around 8 to 10 ounces and choose a relaxed or unisex fit.
A grade-level team may prefer a classic pullover, while administrators often lean toward a full-zip hoodie for easier layering. Order a sample in each candidate style before committing to a bulk purchase; having staff try on samples prevents sizing complaints later.
School Logo Design Best Practices for Apparel
School logo design best practices for apparel center on one rule: keep the logo the hero of the garment. Industry guidance on popular custom hoodie design ideas shows that oversized back prints, embroidered logos, and minimalist designs lead the trends for 2026. Resist the urge to crowd the chest with a logo, a name, and a mascot. Pick one focal element per placement.
For front placement, an embroidered logo between 4 inches by 4 inches reads as polished. Larger back prints can run up to 11 inches by 11 inches. If your logo includes fine details or small text, simplify it for apparel; what looks crisp on a website often turns muddy on fabric.
Step 1: Prepare Your Logo Files for Printing
Total Time: 30 minutes once you have the files
Print quality depends on file preparation. A logo pulled from your school website is usually too low-resolution. You need vector graphics (.AI, .EPS, or .SVG) that scale without losing sharpness. If you only have a JPEG or PNG, confirm it is high-resolution, ideally 300 DPI at the final print size.
Your printer needs the logo on a transparent or white background, not embedded in a flyer or letterhead. If your logo contains text, convert it to outlines so fonts do not shift between computers.
Vector vs. Raster: Why It Matters for Fabric
Most school logos exist in two forms: vector (created in Adobe Illustrator or similar) and raster (a photo or scan). Vector files scale without losing sharpness; raster files become blurry when enlarged.
For apparel decoration, vector files are non-negotiable for screen printing and strongly preferred for embroidery digitizing. If your school's marketing department or the original logo designer can provide an .AI or .EPS file, that is the gold standard.
What to Do If You Only Have a JPEG or PNG
If a vector file is unavailable, check the pixel dimensions. A 1000-by-1000-pixel logo can print cleanly up to about 3.5 inches wide at 300 DPI; a back print of 10 inches or more needs a file at least 3000 pixels wide.
Second, examine the background. A JPEG with a white or colored box around the logo requires the printer to create a cutout, which can introduce errors; a PNG with a transparent background is far easier to work with.
The Hidden Problem: Low-Resolution Mascot Artwork
Mascot designs are the most common source of file issues. Many schools have a high-quality academic seal but only a small, low-resolution mascot graphic saved from a website or social media page. If the mascot only exists as a 200-pixel-wide image, it will not print well on a hoodie back; use it only for small embroidery (under 3 inches) or have a graphic designer redraw it as a vector.
File Checklist Before You Submit
Use this checklist to avoid the most common delays:
- File format is .AI, .EPS, .SVG, or a high-resolution PNG (300 DPI at final size)
- Logo is on a transparent or solid white background, not embedded in another document
- All text is converted to outlines or curves
- Color mode is set to CMYK (for print) rather than RGB (for screen)
- You have a clean version of the logo without taglines or website URLs that may not scale well
What Your Printer Actually Does With the File
For screen printing, the printer separates your artwork into individual color layers, each becoming a separate screen. Fine lines or small text must be thick enough to hold ink through the mesh; if a line is thinner than a paperclip wire, it may not print cleanly.
For embroidery, the file goes through digitizing where a specialist maps out stitch patterns. Complex gradients and fine details do not translate well to thread; embroidery works best with bold shapes and solid colors, and small text under 0.25 inches tall will likely become illegible.
Getting a Proof Before Production
Always request a digital proof before production begins. This mockup shows how the design will appear on the hoodie, including placement and sizing; review it carefully for spelling errors, color accuracy, and alignment. Many providers offer physical samples or "strike-off" proofs for an additional fee, which is worth the investment for large orders.
The 30-Minute File Prep Routine
Set aside 30 minutes to complete this process properly:
- Locate the original vector file or highest-resolution raster version (5 minutes)
- Verify the logo appears cleanly at the intended print size (5 minutes)
- Remove background elements or embedded text that should not print (10 minutes)
- Export a PNG at 300 DPI with a transparent background as a backup (5 minutes)
- Email both files to your provider with a note about placement and size (5 minutes)
This routine prevents the most common production delays and ensures your custom teacher hoodies arrive on schedule.
Step 2: Pick Your Print Method: Screen Printing vs. Embroidery
Screen printing and embroidery serve different purposes, depending on your design and budget. Screen printing lays ink on the fabric surface, ideal for large, colorful back prints and gradients. Embroidery stitches the logo directly into the garment, which looks premium and lasts for years without cracking or fading.
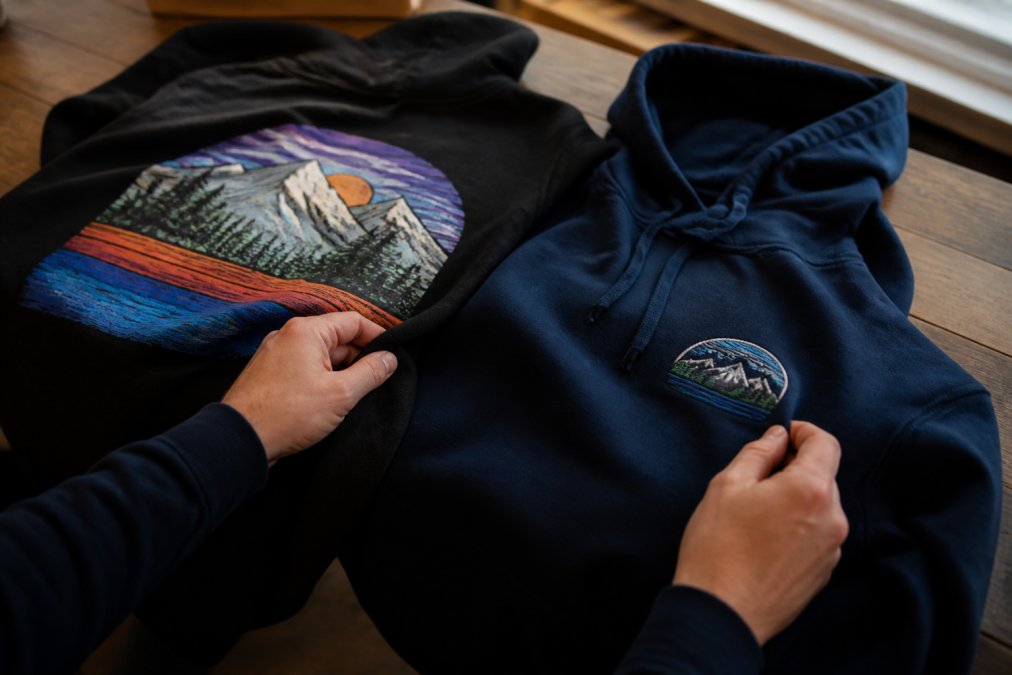
For a clean, professional staff uniform, guidance on custom school apparel highlights high-definition embroidery as the leading method for front logos because it delivers durability and a finished look. Screen printing suits a large mascot on the back or a colorful design with many shades. Many schools combine both: an embroidered chest logo paired with a screen printed back.
Step 3: Choose Colors That Match Your School
Color matching is where expectations often diverge from reality. The colors on your computer screen rarely match the final print exactly, since screens emit light while ink and thread reflect it. Request a physical proof or sample swatch before the full run.
Provide your printer with official color codes, such as Pantone numbers, rather than saying "our blue." When layering colors, remember that light ink on dark fabric requires an underbase, which can slightly change the final hue. If your school colors include a metallic or neon tone, embroidery thread options may be more limited than screen printing ink, so confirm availability early.
Custom Teacher Apparel Ideas That Get Worn
The most successful teacher apparel ideas involve the faculty in the design. Sending a survey with two to three design options lets teachers vote on the final look, and research on teacher and faculty apparel shows that designs chosen by teachers are worn more frequently and with greater pride.
Beyond the standard chest logo, consider subject-specific designs. A science department hoodie might feature a subtle molecule pattern on the sleeve, while a math team could incorporate a geometric print on the back yoke. Vintage or distressed aesthetics remain a top trend for 2026.
How to Manage Bulk Ordering Custom School Hoodies
Bulk ordering custom school hoodies runs smoothly when you plan backward from your event date. A teacher appreciation event in three weeks is feasible but leaves little room for errors or reprints. Start at least four to six weeks out to allow time for design approval, production, and shipping.
Collect all orders and sizes in a single spreadsheet before contacting your provider. Decide on the minimum order quantity early; many small groups of 8 to 15 people worry about meeting minimums, but many providers accommodate smaller runs. Keep garment style selection separate from logo specifications during planning, as recommended in current custom sweatshirt production standards. This prevents confusion when comparing quotes across different blanks and decoration methods.
The Group Order Coordinator Role
Every successful staff apparel order has one person acting as the coordinator, handling communication with the provider, collecting payments, and managing size collection. If you are that person, your first step is to establish a single point of contact with your decoration provider.
Building the Order Spreadsheet
A well-organized spreadsheet is the backbone of a smooth group order. Create columns for teacher name, email address, garment style (pullover vs. zip-up), size (XS through 3XL), personalization (name, grade, or subject, if offered), payment status, and order confirmation number. Use data validation in Google Sheets or Excel to create dropdown menus for sizes and styles, preventing typos.
Managing Size Collection Without the Chaos
Size collection is the most error-prone part of group ordering. The most reliable method is to order a sample size run from your provider: one hoodie in each size (XS through XXXL) set up in the teachers' lounge or office during planning periods, and let staff record their preferred size directly in the spreadsheet.
If ordering samples is not feasible, provide a detailed size chart and ask teachers to measure a hoodie they already own; chest measurement and overall length are the two most important dimensions. Warn staff that unisex sizes fit differently than women's-specific cuts.
Collecting Payments Without the Awkwardness
Money collection is often the biggest friction point. Set a clear deadline for payments and communicate it in writing. Offer multiple payment methods: cash, check, or a digital platform like Venmo or PayPal.
For larger orders, consider asking for a deposit before placing the order. A common pattern is to collect the full amount upfront, eliminating the need to chase people after the hoodies arrive. If your provider requires a minimum order quantity, collect a preliminary amount and reconcile the difference when the final invoice arrives.
Setting a Realistic Timeline
Work backward from your target delivery date. Standard production for screen printed or embroidered hoodies is 10 to 15 business days after design approval. Shipping adds 3 to 7 business days, and design revisions add 5 business days, meaning a realistic minimum lead time is about 4 weeks from order placement to delivery.
For embroidery-only orders, production may take slightly longer because each garment requires individual stitching time; a bulk order of 50 hoodies can take 5 to 7 business days of production alone. If ordering during peak seasons (August for back-to-school or November for holiday gifts), add an extra week.
Handling Late Additions and Size Exchanges
Plan for the inevitable: someone will forget to submit their order or want to change sizes after the order is placed. Establish a policy upfront. Most providers allow additions before the production start date, but this may incur a separate setup fee. To minimize issues, order one or two extra hoodies in the most common sizes (M, L, XL) as spares.
Communicating With Your Provider
When you contact your provider, have the following ready: exact quantity needed (or a range), preferred garment style and color, decoration method (screen printing, embroidery, or both), logo files (prepared as described in Step 1), target delivery date, and budget per unit. If comparing quotes from multiple providers, use the same specifications for each request.
The Final Delivery Check
When your order arrives, do not distribute immediately. Open a few boxes and inspect the quality: check that logo placement is consistent across garments, colors match the approved proof, and sizes are correct. If you find defects, photograph the issue and contact your provider within 48 hours of delivery.
Make Your Custom Teacher Hoodies Last
A great design means little if the print fails after ten washes. Turn hoodies inside out before washing in cold water, and tumble dry on low or hang to dry. High heat is the fastest way to crack screen printed ink and distort embroidery. Avoid fabric softeners, which break down fibers and dull the print over time.
Screen printed designs typically last for years when cared for properly, while embroidery is nearly permanent. If ordering for a group that will wear these weekly, the slightly higher upfront cost of embroidery or a quality screen print pays off in longevity.
Creating custom teacher hoodies that faculty love comes down to preparation: choosing a comfortable blank, sending print-ready files, and picking a decoration method that matches your design. Whether you need a small run for a grade-level team or a full order for the entire staff, Urban Echo Tees specializes in personalized teacher apparel that celebrates the people shaping young minds. Get started with Urban Echo Tees and design custom teacher hoodies your staff will actually wear.
Frequently Asked Questions
What are the best file formats for printing school logos on hoodies?
Use vector files like AI, EPS, or PDF for the sharpest results. These formats scale to any size without losing quality. If you only have a JPG or PNG, make sure it is high-resolution, at least 300 DPI at the final print size. A clean vector file lets the printer match your school colors accurately and keeps the logo crisp on the fabric.
How do I add a logo to a hoodie without compromising quality?
The safest route is professional screen printing or high-definition embroidery. For complex logos with gradients, full sublimation dyes the design directly into the fabric, which prevents cracking or peeling. Avoid DIY heat press transfers for large orders, as they tend to crack and fade faster than professionally applied designs.
What are the most comfortable hoodie fabrics for teachers?
A cotton-polyester blend is a popular choice for everyday wear. It resists shrinking and wrinkles while staying soft. For a heavier, warmer feel, look for a fleeceback hoodie with a higher fabric weight. Teachers spend all day moving, so choose a mid-weight option that feels broken in from the first wear.
How far in advance should we order custom teacher hoodies?
Plan for at least three weeks lead time. This allows for design approval, production, and shipping. For larger bulk orders or if you need specific sizes for everyone, start four to six weeks ahead. Rushing an order often means paying for faster shipping, so early planning keeps costs down.