

How to Choose Custom Shirt Sizing: A Step-by-Step Guide
Table of Contents
- Understanding Body Measurements vs. Garment Measurements
- How to Measure a Shirt for Printing
- Reading a T-Shirt Design Size Chart
- Choosing Your Custom Shirt Sizing Based on Fit Preference
- Best Practices for Ordering Custom Apparel
- Common Sizing Mistakes to Avoid
- T-Shirt Design Placement and Positioning
- Conclusion
Last Updated: August 16, 2026
Understanding Body Measurements vs. Garment Measurements
Your body measurements and garment measurements are fundamentally different. When you measure your chest, you capture your torso's circumference. When you measure a garment, you measure actual fabric dimensions laid flat. These numbers rarely match, and that gap is where fit problems begin.
Most people assume a shirt matching their body measurements will fit perfectly. It won won't. Garments need ease, extra space built in for movement. A typical shirt designed for regular fit includes 2-4 inches of ease in the chest. Without it, you'd feel restricted and the fabric would wear faster.
Understanding this distinction is foundational to choosing custom shirt sizing correctly. The measurement points that matter most are chest width, sleeve length, shoulder width, and overall length. Each affects how the final garment will feel and look when worn.
How to Measure a Shirt for Printing
Measuring a shirt correctly requires precision, the right tools, and knowledge of which points matter. This process differs depending on whether you're measuring your own body for a custom order or measuring an existing garment to understand its dimensions.
Tools You'll Need
Start with a soft measuring tape, the kind used in sewing and tailoring. A rigid ruler won't work because fabric curves around your body. The tape should be at least 60 inches long. You'll also want a mirror or a second person to help, measuring yourself accurately is nearly impossible alone. If you're measuring an existing garment, lay it flat on a clean surface and smooth the fabric completely before starting.
A simple soft tape and a flat surface are all you actually need. If you're ordering from any custom apparel provider, they'll typically provide a sizing guide showing exactly which measurements they need.
Key Measurement Points
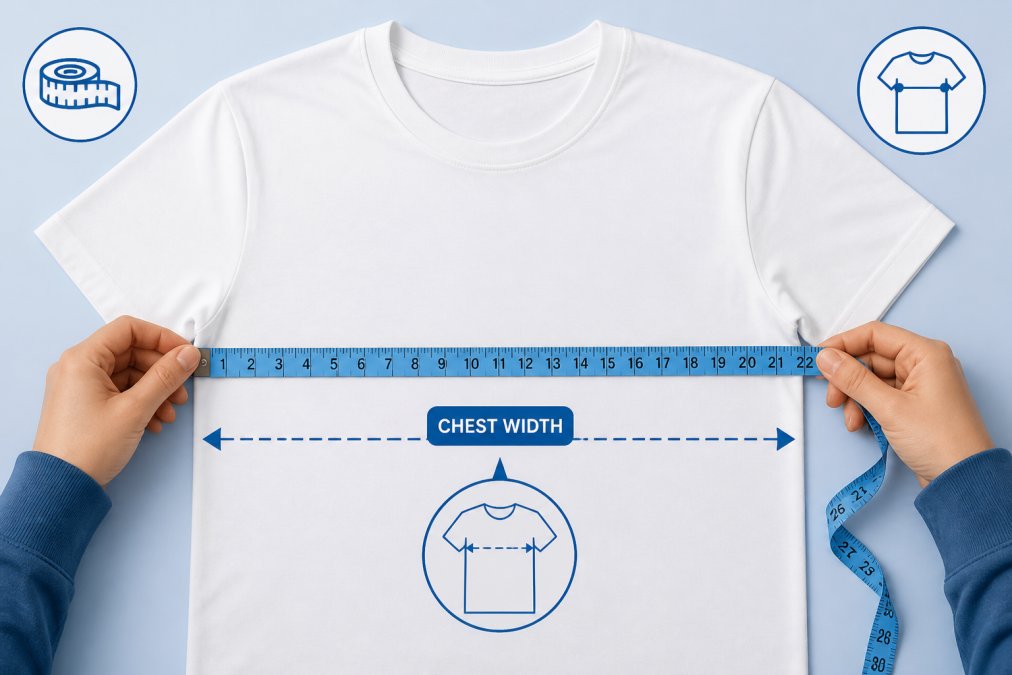
The chest width is the most critical measurement for shirt fit. Place the tape horizontally across the fullest part of your chest, under your arms. Keep the tape snug but not tight. A 40-inch chest measurement with a 44-inch garment chest width creates a relaxed fit; the same body measurement paired with a 42-inch garment creates a regular fit.
Sleeve length measures from the center back neck, down the shoulder, and along the arm to your wrist bone. This is trickier solo, which is why having a second person helps. The tape should follow your arm's natural curve. If measuring an existing shirt you love, lay it flat, measure from shoulder seam to cuff, and add about an inch for the seam allowance.
Shoulder width is measured across the back from shoulder point to shoulder point. Garment shoulder width should match your actual shoulder width fairly closely, there's less room for ease here than in the chest. If the shoulder seam sits too far out on your arm, the entire shirt will feel sloppy.
Overall length measures from the base of your neck down to where you want the hem to fall. For a standard crew-neck shirt, this is typically mid-hip. This measurement is personal preference, but consistency matters.
Reading a T-Shirt Design Size Chart
A t-shirt design size chart translates your body measurements into a size label and tells you the actual garment dimensions you'll receive. These charts vary between manufacturers, which is why a size medium from one brand might fit completely differently than a size medium from another.
Most size charts include columns for size label (XS, S, M, L, XL, 2XL), chest width, sleeve length, shoulder width, and overall length. Read the header row carefully, it should specify whether measurements are taken from the body or from the garment laid flat. Garment measurements are what matter for fit.
When choosing custom shirt sizing from a chart, find the row where the garment chest width is 2-4 inches larger than your actual chest measurement. If you measure 38 inches across the chest and prefer a regular fit, look for a garment with 41-42 inches of chest width. If you prefer slim fit, look for 40-41 inches. If you prefer relaxed fit, look for 42-44 inches.
Cross-reference sleeve length carefully. If you measure 32 inches from center back neck to wrist, you want a garment with 32-inch sleeves. Shoulder width should be within a half-inch of your actual shoulder measurement. Overall length depends on where you want the hem to fall.
Choosing Your Custom Shirt Sizing Based on Fit Preference
Fit preference is personal but not random. Once you understand the relationship between body measurements and ease allowance, you can choose a fit style that matches both your body type and aesthetic preferences.
Slim, Regular, and Relaxed Fits
A slim fit shirt has 2-3 inches of ease in the chest. If you measure 38 inches across the chest, a slim-fit shirt will measure 40-41 inches. This creates a fitted look that follows your body contours without clinging. Slim fit works well if you have an athletic build or prefer a more tailored appearance, though it reduces mobility.
A regular fit shirt has 3-4 inches of ease. A 38-inch chest gets a 41-42 inch garment. This is the most versatile fit for most body types, allowing comfortable movement while still showing your natural shape. Regular fit is the default choice for most casual wear and everyday comfort.
A relaxed fit shirt has 4-5 inches or more of ease. The same 38-inch chest would get a 42-44 inch garment or larger. This creates a loose, comfortable silhouette that prioritizes movement and comfort over body definition. Relaxed fit is ideal if you prefer layering, have a larger build, or like the aesthetic of looser clothing.
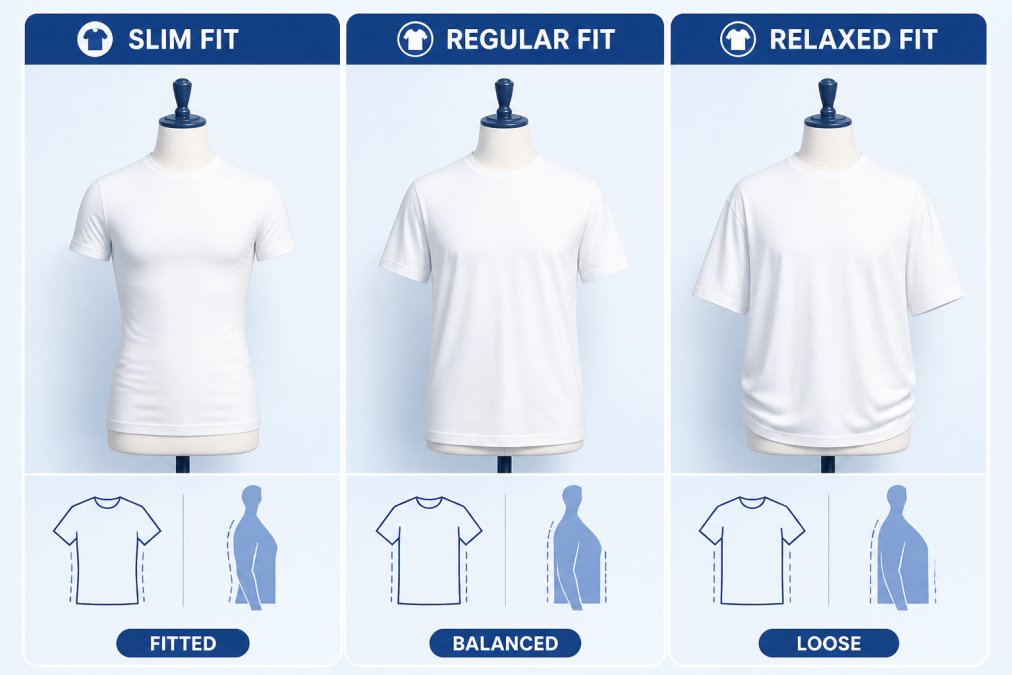
Choosing between these three requires honest assessment of both your body and your preferences. If you've worn fitted clothing comfortably in the past, slim fit works. If you're unsure, regular fit is the safest starting point.
Accounting for Fabric Shrinkage
Fabric shrinkage is real and often unexpected. Cotton typically shrinks 2-3 percent when washed in warm water and dried in a dryer. Blended fabrics with polyester shrink less, sometimes only 1 percent. "Pre-shrunk" doesn't mean zero shrinkage, it means the manufacturer has already shrunk the fabric once.
If you're ordering a shirt that measures 42 inches across the chest and the fabric is 100 percent cotton, expect it to shrink to approximately 40.8-40.9 inches after washing and drying. That half-inch loss changes how the shirt fits. A regular fit becomes slightly more fitted. A slim fit becomes noticeably tight.
Ask the manufacturer about their fabric composition and pre-shrinking process before you order. If you know you'll be machine washing, add 0.5-1 inch to your desired chest width measurement to account for shrinkage.
Best Practices for Ordering Custom Apparel
Start by measuring yourself or an existing garment you love that fits well. Write down all your measurements, chest, sleeve length, shoulder width, and overall length. Don't trust memory.
Next, review the size chart provided by the custom apparel manufacturer. Match your measurements to the chart, not the size labels. If you fall between two sizes, choose based on your fit preference. If you prefer slim fit, size down. If you prefer relaxed fit, size up. Factor in fabric shrinkage if you plan to machine wash.
Before finalizing your order, check the design placement guidelines. A design placed too high will look awkward on a larger size. A design placed too low might end up below the hem on a smaller size. The best placement is centered and positioned roughly 2-3 inches below the neckline for a front chest design.
Consider ordering a sample or prototype if this is your first order with a new manufacturer. Many custom apparel providers offer sample shirts at a modest cost, letting you verify that sizing, fit, and design placement match your expectations before ordering in bulk.
Common Sizing Mistakes to Avoid
The most common mistake is confusing body measurements with garment measurements. People measure their chest, find that measurement in a size chart, and assume that's the size they need. In reality, they need a size that's 2-4 inches larger than their body measurement.
Another frequent error is not accounting for fabric shrinkage. Someone orders a shirt that fits perfectly when it arrives, then shrinks it in the wash and suddenly it's too small.
Measuring yourself without help is surprisingly difficult. Your measurements will be inconsistent if you're twisting to see the tape or holding it at different tensions. Always measure twice and verify consistency. Better yet, have someone else measure you.
Ignoring the size chart is another trap. Some people see a size label they recognize from other brands and order that size without checking actual garment measurements. Size labels are meaningless across different manufacturers.
Choosing a fit style based on what you think you should wear rather than what actually fits your body is surprisingly common. Order based on your actual body, your movement needs, and your genuine comfort preferences.
T-Shirt Design Placement and Positioning
Design placement determines whether your custom shirt looks professional or amateur. The most common placement for a front chest design is centered, positioned 2-3 inches below the neckline. This is high enough to be visible but low enough to avoid the collar and neck seam.
The size of the design matters for placement. A small logo (2-3 inches wide) positioned 2-3 inches below the neckline looks balanced. A larger design (6-8 inches) should be positioned slightly lower, around 3-4 inches below the neckline, to maintain visual balance.
Back designs typically center between the shoulder blades, positioned roughly 4-6 inches below the neckline. This placement is visible when someone is facing away from you and maintains good visual balance across the back panel.
Visual balance is critical for how your custom shirt looks. A design that's too high makes the shirt feel unbalanced. A design that's too low looks like an afterthought. Centered, with appropriate spacing from the neckline, is the standard for a reason.
When ordering from Urban Echo Tees or any custom apparel provider, ask for a mockup showing exactly where your design will be placed on your specific size.
| Design Size | Placement | Best For | Visual Impact |
|---|---|---|---|
| Small (2-3 inches) | 2-3 inches below neckline | Logos, initials, small graphics | Subtle, professional |
| Medium (4-5 inches) | 2.5-3.5 inches below neckline | Standard designs, text | Balanced, visible |
| Large (6-8 inches) | 3-4 inches below neckline | Statement designs, artwork | Bold, dominant |
| Extra Large (8+ inches) | 4-5 inches below neckline | Full-chest designs | Eye-catching, requires confidence |
Choosing custom shirt sizing correctly transforms the ordering process from guesswork into precision. The fundamentals are straightforward: understand the difference between your body measurements and garment measurements, measure accurately using the right tools, read the size chart carefully, and account for fabric shrinkage. Urban Echo Tees specializes in custom apparel for meaningful occasions, teacher appreciation events, family trips, weddings, and holidays. Getting the sizing right means your custom shirts actually get worn and treasured. Start with accurate measurements, choose your fit preference based on honest assessment of your body and comfort needs, and verify design placement before production.
Frequently Asked Questions
How do I measure myself for a custom-fit shirt?
Start with a measuring tape and wear the undergarments you'll wear with the shirt. Measure around your chest at the fullest point, keeping the tape snug but not tight. For sleeve length, measure from the center back neck down to your wrist with your arm relaxed. For shirt length, measure from the base of your neck to where you want the hem to fall. Compare your body measurements against the garment's size chart provided by the custom apparel vendor to find your best fit.
Should I size up or down for custom-printed shirts?
Most custom shirt printing doesn't require sizing adjustments unless you're accounting for fabric shrinkage. If the garment is 100% cotton, sizing up slightly (half a size) can help offset potential shrinkage after washing. However, check the specific fabric blend, many modern custom apparel options use pre-shrunk materials. When in doubt, order a sample or compare your body measurements directly to the garment measurements provided in the size chart rather than guessing up or down.
What's the difference between body measurements and garment measurements?
Body measurements are your actual physical dimensions (chest, sleeve length, etc.), while garment measurements describe how the finished shirt is sized. A garment's chest measurement is typically 2-4 inches larger than your body measurement to allow for comfortable movement and layering. Always compare your body measurements to the garment's size chart rather than assuming your typical retail size, since custom apparel makers often use different sizing standards than mass-market brands.
How does fabric shrinkage affect custom shirt sizing?
Most high-quality custom apparel uses pre-shrunk fabric, which minimizes shrinkage. However, 100% cotton shirts may still shrink 1-3% after washing. If you're ordering custom apparel made from cotton or cotton blends, consider sizing up slightly or choosing a relaxed fit to account for this. Always check the vendor's fabric specifications and care instructions. When ordering for gifts or groups, ask about the shrinkage rate for the specific material before finalizing your custom shirt sizing.
This article was written using GrandRanker